Archive for May 2017
How to Make Your Own Blog Icon Look Beautiful (Icon Favicon) - On this occasion I want to give a tutorial how to create your own blog icon with the icon to your liking. Icon blogger or there are ordinary people call it as a favicon, can you replace with icon or logo design in accordance with your wish tentunnya to look more cool blog look.
What exactly is the favicon and its position there where sh? Favicon is an icon on a web located at the top or next to the adressbar. For standard icon from blogger will look like in picture below:

Icon like this is the default code or icon that generally exist in a blog that you see if the blog has not changed its icon.
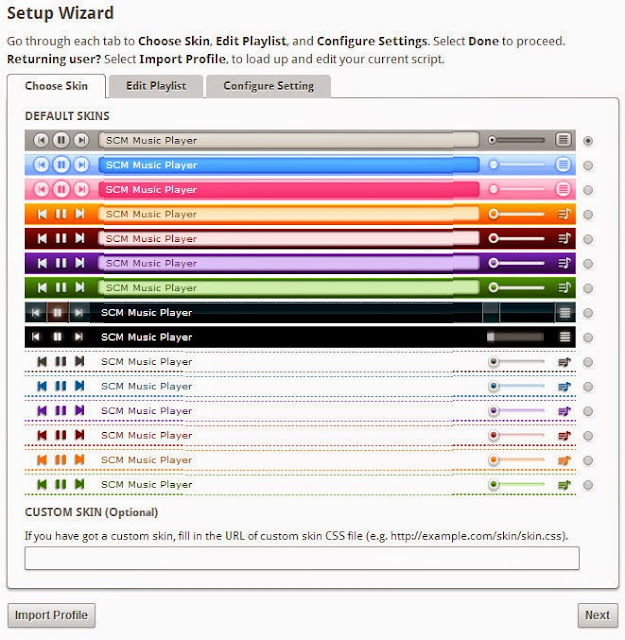
To replace your own blogger favicon icon? You need an icon, logo, or photo with a square shape that has the same width on each side and usually has a 32 × 32 size. The purpose of how to create your own blog icon is to have owned blogs look unique and different from other blogs. And of course this can be a typical blog in the eyes of visitors. Like i have this if you see the top most looks like the following:

Favicon on blog or icon for a blog should be made as good and attractive as possible although with small size, but you should be able to describe favicon or blog icon with what is in the blog. So must be related to each other.
Creating a favicon for blogs is quite easy just that you should be able to operate some editing software or to create an icon. For example by using software CorelDraw or photshop with the software you can make anything you want and the software is so easy to use let alone just to make the icon for blogger is not too difficult.
After creating the icon for the blog, now suppose you already have an icon that will be used on the blog as a favicon, please refer to the tutorial How to Make Your Own Blog Icon Look Cool (Icon Favicon) which I will discuss the following:
How To Easily Replace Icon Favicon In Blog
Here I will use one website like Genfavicon.com to create a favicon
1. Please go to the site genfavicon.com Then you will look like this:


What exactly is the favicon and its position there where sh? Favicon is an icon on a web located at the top or next to the adressbar. For standard icon from blogger will look like in picture below:

To replace your own blogger favicon icon? You need an icon, logo, or photo with a square shape that has the same width on each side and usually has a 32 × 32 size. The purpose of how to create your own blog icon is to have owned blogs look unique and different from other blogs. And of course this can be a typical blog in the eyes of visitors. Like i have this if you see the top most looks like the following:

Actually to replace this blogger favicon in blogspot already provided on Layout menu / Layout on Dasboard Blogger. By default all blogs created from blogger will have the same favicon as the blogger favicon before we replace it ourselves like the example above. For how to create your own blog icon, please refer to the following reviews.
How to Create Your Own Blog Icon
Before you decide to change blogger favicon, I suggest you better prepare the favicon first. This favicon can be built with Adobe Photoshop, Generaton icon online, or use your own photo / picture / logo. Make sure also the favicon size is a 32 × 32 square. If you want to create your own favicon you can create a favicon icon with Photoshop that can help you.
Changing the favicon on a blog should be done by every Blogger, because in checking SEO using online tools sometimes a favicon will also be assessed, if you use the default favicon of blogger then it is considered that the website or blog is not using a favicon, so it would be nice if you Replace the favicon on your blog with your own homemade favicon.
Favicon on blog or icon for a blog should be made as good and attractive as possible although with small size, but you should be able to describe favicon or blog icon with what is in the blog. So must be related to each other.
Creating a favicon for blogs is quite easy just that you should be able to operate some editing software or to create an icon. For example by using software CorelDraw or photshop with the software you can make anything you want and the software is so easy to use let alone just to make the icon for blogger is not too difficult.
After creating the icon for the blog, now suppose you already have an icon that will be used on the blog as a favicon, please refer to the tutorial How to Make Your Own Blog Icon Look Cool (Icon Favicon) which I will discuss the following:
How To Easily Replace Icon Favicon In Blog
Here I will use one website like Genfavicon.com to create a favicon
1. Please go to the site genfavicon.com Then you will look like this:

2. Enter the picture you have prepared there 2 options please select either through the url image or upload it directly (here I choose menguploadnya) and then click Upload image. Then it will look like this:

3. If you have uploaded then you can Select Size to determine the size of the image. Or also you want to cut it (crop & preview) according to the look you want. For this option please select on menu number 2 in the example picture above. If you please please select capture & preview.
4. Next after you select the capture & preview will come out your favicon view, please select Download: png. For more details note the picture below:

After you download the favicon the next step is to install on your own blog.
How to install Favicon on Blog With Easy
After the icon you have created and ready to be installed on the blog, it's time to replace the default favicon on your blog, note the following steps:
1. Login to your Blogger account. In the Blogger Dashboard please select the Layout menu (Layout), then select the favicon, note the following picture:

2. Next click EDIT and input the file you have downloaded from favicon.cc or genfavicon.com service that you have made, then save or save. Note the following picture:

3. The last stage after you finish save, then check on your blog and see the results:

Very easy is not how to create your own blog icon easily and quickly. Only based on the selection of images that match the theme of your blog and your creativity and you can make a favicon cool and interesting.
Similarly the article about "How to Create Your Own Icon Blog Cool (Icon Favicon)" which we have discussed this, hopefully this article can be useful and increase your knowledge.
Note: if this article is useful to you, PLEASE this article is shared to others AGAR other friends also get the information, and if you wish also can like the above fanspage to follow the latest update next. thanks.
How to Make Your Own Blog Icon Look Cool (Icon Favicon)

Who does not like music?
Even many things that make our visitors feel at home for long time hanging out in our blog, in addition to rich content, full of information, music also become one of the alternatives that make visitors feel at home to explore our blog. This time Admin will discuss how to install music player on blog that we have. In this case we demonstrate how to install SCM Music Player on Blog. Okay, go ahead,
1. Open Web Scm Music Player.
Here we choose what style to match the color of our blog or we can use the style that we make ourselves in the form of css, which of course we have uploaded on the internet, so we live pinning the url in the custom skin column. If you have selected the desired style click Next.
2. Enter the desired song
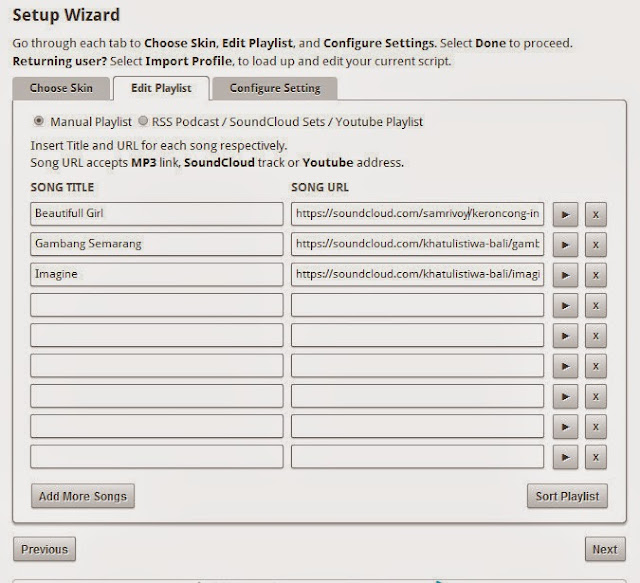
Well this part where we choose the favorite song that we will present in Blog later, in this view there are 2 columns. that is
1. Song Title
Can we fill with the title song or singer or both of them.
2. Song Url
Here we embed (paste) the url of the song we want, the URL of the song can be taken from the web eg from youtube and soundcloud. Click to tutorial how to take a song from soundcloud and youtube.
Do not forget to test the url that we enter, whether to play music or not by clicking the play sign

If it is running in accordance with the desired, do not forget to click next.
3.Setting
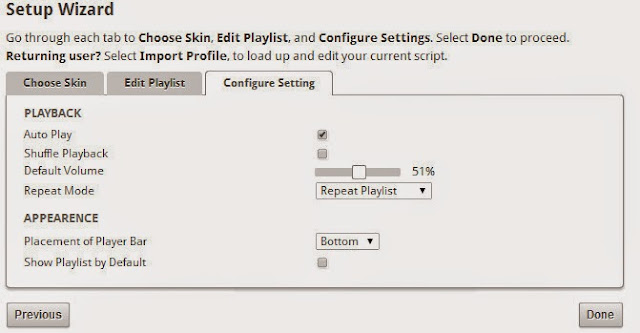
- Autoplay
For songs to automatically play when the blog is opened
- Shuffle Playback
Random song
- Default Volume
Determine how hard the volume will be played when you first load the blog.
- Repeat Mode
Contains 3 options: Repeat Playlist (Repeat song from first song if all songs have been played), play playlist once (play playlist once), repeat item (repeat one track.)
- Placement Of Playerbar
Contains 2 player placement options later on top (top) and bottom (bottom).
- how playlist by default
Functioning when checked will show the playlist list of songs since we first open the blog
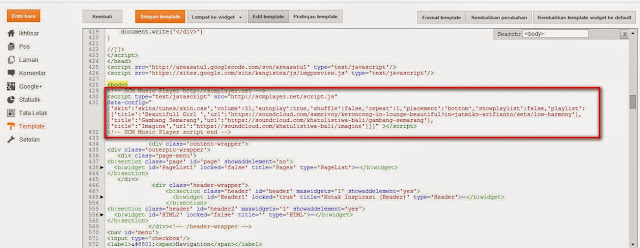
When all is considered good click done. Then we will get the html code to be placed on our blog which is exactly below <body> before the </ body> sign. Remember ... under <body>
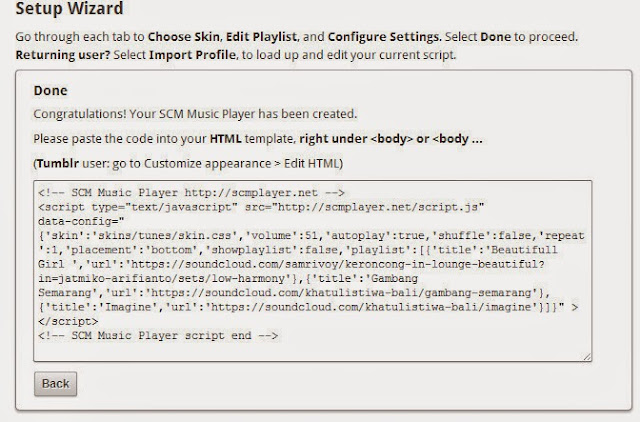
Go to blogger => Login => and go to your blog. Select template => edit html => in the box containing the html code, find the <body> tag by clicking inside the box containing the html code. Press [ctrl + F] then type <body>. After found then the next step we paste the code under <body>.
Well Now we go in The final step of testing. Open the blog and enjoy your favorite music.
How To Install Music In Blog With SCM Music Player
Changing Blog Templates is a common way bloggers do to make the site look more interesting and nice to look at. In addition to updating the view, replace the Blog template is also commonly used for the site more SEO Friendly.
Changing the template on a Blogger (blogspot) is certainly not a difficult thing, in this article Jaka explain an easy way to replace and install a new template in a Blogger and recommend the best blog templates download site site version of handifa21.blogspot.co.id .

Currently there are various Blogger templates that you can use for free. Starting from Responsive template, SEO Ready, Ads Ready, Slideshow and many more. Before you start installing a new template, you can first select the Blog template you want to use.
Blogger Template Download Sites
Here are some recommendations of sites where Blog template downloads you can try. If you've found a template you like, download the template and follow the steps below to install the template on Blogger.
- Gooyabi Templates
- My Blogger Themes
- Btemplates
- Templateism
- Co. Templates
- ThemeXpose
- Deluxe Templates
- Pro TemplatesLab
Please visit these sites to get the .xml template file.Oke, following its stages :
1. Here I use the template from Btemplates.com, there are various types of templates that are provided can be adjusted with this blog us. Please find the template you want. Then click the download button

2. After the template file is downloaded, extract the file by using winrar, so that the folder appears that contains template file with .xml

3. Go to the blogger dashboard, click menu template, click tblo Backup / Restore

4. Choose / search the extracted template file earlier, then click open

5. Click upload, and wait for the process for a while

6. After the template upload, then the view of your blog will soon change. Well you can see directly the look of your new blog by pressing the "see blog".

7. DONE

And now the look of your blog has been successful in the fox. So tutorial how to change blogger template. Easy enough is not it? Hopefully this simple tutorial can be useful for my readers as well
Happy blogging ^ _ ^. .
How To Easily Replace Templates (Themes) in Blogger

Here is one way to embed (embed) documents form Word, Excel, PPT and PDF on our blog or website through google docs. Google docs is a media storage of our documents that can be viewed directly online without downloading it first. For those of you who first enter the google docs, then you have to agree with the rules made by google. Here is how to embed / install google drive documents on your blog or website.
Step 1: Upload the file to google docs
1. Please login to http://docs.google.com with your gmail account.

2. Click the Open File Picker button located on the right side of your monitor screen.

3. Click the Upload button, it will display the Open a file menu view.

4. Next click "Select a file from your computer" or slide the file you want to upload to the computer screen. The file you upload can be a pdf file, word, excel, or power point.

5. Wait a while until your file uploads everything (depending on the size of the file and the speed of your connection).
6. If you have uploaded, you can edit it if you want, that is by clicking documents that have been uploaded in the My Drive menu.
7. Then to share select Share

8. Then display Sharing with others. Click the "Get shareable link"

9. Before you copy the link to share, you can change the authority of the reader, ie Anyonewith the link can edit, can comment or can view (depending on your needs)
10. Next copy the link and click Done.
11. To make it easy to open notepad or MS Word to move links:
Examples of links obtained as follows:
https://docs.google.com/document/d/1pTkGr7x3T-WYOqxDVkiqB2ynlwhR3olHHFJtxnvIQ2I/edit?usp=sharing
Step 2: Post the code google docs to blogger
1. Please login to blogger with your ID.
2. Click New Entry to create a new post.

3. Please make your post you want.
4. When you want to insert the code from google docs, there are two ways to use HTML or Compose tab.
5. Write the word "Download" on the post and block. Next click on the link menu in the menu bar.

6. Edit Link will appear. Paste the google docs code in the notepad earlier in the place you want. Click Ok.

7. Click PUBLISH Button. Next please see the results in your blog.
8. Done.
HOW TO UPLOAD FILE IN BLOG TO BE IN DOWNLOAD
How to Live Stream On Youtube? The question is very often asked when handifa21.blogspot.co.id watch a live streaming video from other youtuber in indonesia.
And this time handifa21.blogspot.co.id will try to give tutorial how to live streaming on youtube with easy and simple. In addition to tutorials you will also find a lot of information about live streaming on youtube other that hopefully can increase your knowledge about live streaming on Youtube.
Terms For Live Streaming
For live streaming, you must have a youtube account that meets the following requirements
The first requirement to be able to perform live streaming on youtube is to have a verified youtube channel. The trick is very easy, you just visit http://www.youtube.com/verify with conditions already logged into youtube and enter the phone number that can be contacted to receive sms or phone contains verification code.
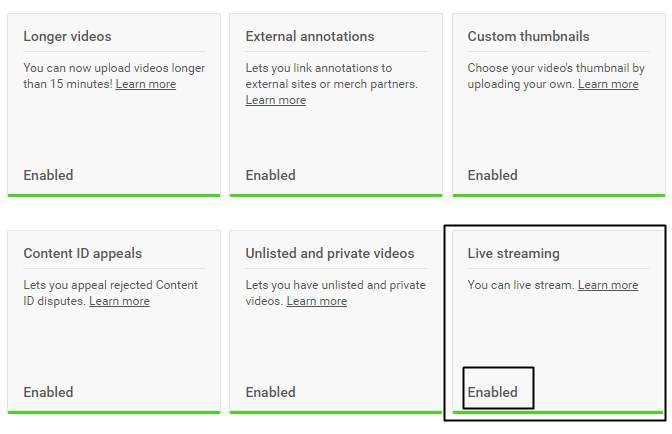
The second condition is to enable the Live streaming feature on the https://www.youtube.com/features page. And make sure you see the status of your channel Partner Verified.

And also do not forget Live Streaming feature must be in Enabled condition.
Once qualified, you can directly perform live streaming on youtube. There are two types of live streaming on Youtube ie Stream now and Events. The difference between the two is, Stream now is suitable for a very simple live event, once you start streaming live from your PC, live streaming will start immediately. This is most often used by Youtubers, like Youtuber Gaming in Indonesia which often do live Streaming on youtube.
On the Stream now page you will see 4 Settings:
And this time handifa21.blogspot.co.id will try to give tutorial how to live streaming on youtube with easy and simple. In addition to tutorials you will also find a lot of information about live streaming on youtube other that hopefully can increase your knowledge about live streaming on Youtube.
Terms For Live Streaming
For live streaming, you must have a youtube account that meets the following requirements
The first requirement to be able to perform live streaming on youtube is to have a verified youtube channel. The trick is very easy, you just visit http://www.youtube.com/verify with conditions already logged into youtube and enter the phone number that can be contacted to receive sms or phone contains verification code.
The second condition is to enable the Live streaming feature on the https://www.youtube.com/features page. And make sure you see the status of your channel Partner Verified.

Once qualified, you can directly perform live streaming on youtube. There are two types of live streaming on Youtube ie Stream now and Events. The difference between the two is, Stream now is suitable for a very simple live event, once you start streaming live from your PC, live streaming will start immediately. This is most often used by Youtubers, like Youtuber Gaming in Indonesia which often do live Streaming on youtube.
On the Stream now page you will see 4 Settings:
- Basic Info / Basic Info. Where you give the title and description Live Streaming to live streaming category.
- Stream Option / Stream Settings. Here you can choose to enable DVR or not, save live streamed video or not, choose stream optimization to add delay
- Monetization. If you want live stream videos you make money then you must activate it.
- Cards. If this is to add an interaction to your live streaming video, such as text, links, images up to the call to action button.
Whereas if you do live streaming via Events, then you can schedule when the live stream will start so that it can prepare live stream with more mature. You can try your live streaming without being noticed by the viewers and you can do more complicated settings so that live streaming can be more in line with your wishes and more optimal. You have to do the scheduling first, for example 30 minutes from now live streaming will begin.
Well in this article, handifa21.blogspot.co.id will only discuss how to live streaming on Youtube with a simple use Youtube Stream Now. For Live streaming tutorial via Events on Youtube, will we make the article as soon as possible, because it is quite complicated hehe.
How To Live Stream On Youtube With Easy
Creating a Vlog on Youtube seems not unusual anymore in Indonesia, many youtuber Indonesia deliberately routinely create and upload Vlognya to Youtube. Not infrequently Vlog videos from The Youtuber Indonesia This goes into trending Video accompanied
The news about the high income of youtuber and the fame obtained is fantastic, making many people in Indonesia want to start his career on Youtube and create Vlog. Unfortunately in Indonesia itself is still a little article or tutorial that explains about how to create a vlog on youtube.
Well in this article, Handifa21.blogspot.co.id will explain as much detail and as clearly as possible an answer from your question that read: "How do I make a vlog on youtube and become famous youtuber?"
For those of you who enter into this article by accident, and do not know what Vlog is, here's the explanation.
What is Vlog?
Vlog is short for Video Blog or can also be interpreted as Blog in the form of Video. Vlogs usually record a person's activities or contain specific topic discussions. Vlogs are currently more idientik with youtube, travel vloger and motovlog are the 2 most popular topics and are often used by youtuber in creating a blog video.
So if a blog post usually explains and discusses certain topics through a series of writings, images and other multimedia files, while a vlog explains or discusses certain topics through recording of conversations and videos plus other supporting multimedia files like music and pictures.
5 Easy Steps How to Create a Popular Fast Vlog
Step - 1 ,
Create First Youtube Account and Youtube Channel
Initial capital to be youtuber yes create an account and a channel with a unique and interesting name on Youtube.
Step - 2,
Getting Started Creating Vlogs
Use a good camera to record a Vlog, at least a camera with 720p video resolution, but if you can use a 1080p camera for maximum vlog quality.
Which camera is suitable for vlog?
Some say to make Vlog we need a DSLR class camera, but actually with cheap camera and good lighting, Vlog will still look professional and comfortable to watch.
Also note the audio quality of your vlogs, if the built in microphone on the camera does not produce maximum sound, you can use an external microphone that cost is not too expensive. Microphone is on the Smartphone also you can use if the results are more clear than the audio produced by the camera.
Vlog about what should I make?
The answer depends on what you want to accomplish. If you just want to just upload vlog to youtube, please upload video of your daily life from waking up to sleep again, but guaranteed your video will not be popular, most of which watch only 2 or 3 people hehe.
So, please create a Vlog with a topic you created yourself, but remember! Do not ever imitate the famous Youtuber Vlogs, famous youtubers are often uploading Vlogs with topics that are not important but a lot of viewers, this is because the audience is not thinking about the topic of the vlog but who made the vlog.
Well, if you already have a good camera, the topic you want to lift and other supporting equipment, then go to the next step.
Step - 3,
Create Your First Vlog
Do not get too crazy
For example if you want to create a travel vlog, as a new youtube channel, do not commit foul decay too long, because it will increase our video bounce rate
Avoid intros or introductions that are too long, for example, "Welcome to the channel Ngevlog, this channel is a special channel uploading high-quality vlog about what can be recorded, this time I want to bandung and nyari hidden natural beauty, .... While shouting hello bandung residents what kabarnyaaaaa? Do not forget to subscribe, like share, watch other videos and visit our website so I can get rich and lots of money "
Actually, we can make video titles using effective sentences so that people will know what the contents of the vlog are without having to be explained in a long-winded manner. At the beginning of the live video just open with a short "Hi gw gissa, today I want to walk to bandung and explore the natural beauty" .... While manasin motor engine.
Take as many videos as you can
Usually the youtuber call it footage, well if we ngerekam many videos then we will have a lot of material to take home and we edit. Every recording of our videos will definitely make a mistake or we feel our recording is less fit, less cool.
The more footage we have, the more freely we are in editing the raw video from the camera into a Vlog ready to upload to youtube.
Edit Vlog to make it more perfect

As has been said before, we sometimes get a less than perfect recording. Perform minor edits like color correction and light, Reduce camera shake, watermark and intro additions if deemed necessary for branding.
Step - 4,
Upload Vlog
If you already have a Vlog ready to upload to youtube, do a quick upload with a special optimization to get your videos quickly popular.
Some of the optimizations you can do easily include:
The news about the high income of youtuber and the fame obtained is fantastic, making many people in Indonesia want to start his career on Youtube and create Vlog. Unfortunately in Indonesia itself is still a little article or tutorial that explains about how to create a vlog on youtube.
Well in this article, Handifa21.blogspot.co.id will explain as much detail and as clearly as possible an answer from your question that read: "How do I make a vlog on youtube and become famous youtuber?"
For those of you who enter into this article by accident, and do not know what Vlog is, here's the explanation.
What is Vlog?
Vlog is short for Video Blog or can also be interpreted as Blog in the form of Video. Vlogs usually record a person's activities or contain specific topic discussions. Vlogs are currently more idientik with youtube, travel vloger and motovlog are the 2 most popular topics and are often used by youtuber in creating a blog video.
So if a blog post usually explains and discusses certain topics through a series of writings, images and other multimedia files, while a vlog explains or discusses certain topics through recording of conversations and videos plus other supporting multimedia files like music and pictures.
5 Easy Steps How to Create a Popular Fast Vlog
Step - 1 ,
Create First Youtube Account and Youtube Channel
Initial capital to be youtuber yes create an account and a channel with a unique and interesting name on Youtube.
Step - 2,
Getting Started Creating Vlogs
Use a good camera to record a Vlog, at least a camera with 720p video resolution, but if you can use a 1080p camera for maximum vlog quality.
Which camera is suitable for vlog?
Some say to make Vlog we need a DSLR class camera, but actually with cheap camera and good lighting, Vlog will still look professional and comfortable to watch.
Also note the audio quality of your vlogs, if the built in microphone on the camera does not produce maximum sound, you can use an external microphone that cost is not too expensive. Microphone is on the Smartphone also you can use if the results are more clear than the audio produced by the camera.
Vlog about what should I make?
The answer depends on what you want to accomplish. If you just want to just upload vlog to youtube, please upload video of your daily life from waking up to sleep again, but guaranteed your video will not be popular, most of which watch only 2 or 3 people hehe.
So, please create a Vlog with a topic you created yourself, but remember! Do not ever imitate the famous Youtuber Vlogs, famous youtubers are often uploading Vlogs with topics that are not important but a lot of viewers, this is because the audience is not thinking about the topic of the vlog but who made the vlog.
Well, if you already have a good camera, the topic you want to lift and other supporting equipment, then go to the next step.
Step - 3,
Create Your First Vlog
Do not get too crazy
For example if you want to create a travel vlog, as a new youtube channel, do not commit foul decay too long, because it will increase our video bounce rate
Avoid intros or introductions that are too long, for example, "Welcome to the channel Ngevlog, this channel is a special channel uploading high-quality vlog about what can be recorded, this time I want to bandung and nyari hidden natural beauty, .... While shouting hello bandung residents what kabarnyaaaaa? Do not forget to subscribe, like share, watch other videos and visit our website so I can get rich and lots of money "
Actually, we can make video titles using effective sentences so that people will know what the contents of the vlog are without having to be explained in a long-winded manner. At the beginning of the live video just open with a short "Hi gw gissa, today I want to walk to bandung and explore the natural beauty" .... While manasin motor engine.
Take as many videos as you can
Usually the youtuber call it footage, well if we ngerekam many videos then we will have a lot of material to take home and we edit. Every recording of our videos will definitely make a mistake or we feel our recording is less fit, less cool.
The more footage we have, the more freely we are in editing the raw video from the camera into a Vlog ready to upload to youtube.
Edit Vlog to make it more perfect
As has been said before, we sometimes get a less than perfect recording. Perform minor edits like color correction and light, Reduce camera shake, watermark and intro additions if deemed necessary for branding.
Step - 4,
Upload Vlog
If you already have a Vlog ready to upload to youtube, do a quick upload with a special optimization to get your videos quickly popular.
Some of the optimizations you can do easily include:
- Give the title of an interesting vlog and related to the trending topic
- Write a vlog description that is clear and long
- Promote vlog through social media
- Share vlog via kaskus forums, and sites that allow us to share videos.
Step - 5,
What To Do To Channel Can Grow
Many have complained after reading the articles tips and tricks to be youtuber here because he said they have made a youtube channel and upload the video but not famous. Apparently they like this instant hehe.
Just uploaded a video 1 then complained because subscriber and income never increased, as an overview youtuber will start success and known it on average when it is active on Youtube for at least 6 months with 1 new and original video every 2 weeks.
Then how to make the channel get popular faster?
How to get the fast popular youtube channel you can just do 2 ;
- Upload unique videos (not reupload other people's videos and first) by discussing topics that people are looking for.
- Upload quality videos every day and maximize optimization
Famous Vlogger
In the international arena there is CaseyNeistat who is one of the famous youtuber of his vlog. While in Indonesia there are some Youtuber that often make Vlog, for example Raditya Dika with its RVLOG
Done already an article that explains how to create a vlog on youtube, hopefully the article of section 1001 how to become youtuber enough can be understood and can be used as a useful reference for you aspiring youtuber star indonesia.
How To Create Vlog On Youtube
The phenomenon of video sharing is currently happening. One of the most attention is Youtube. Due to its popularity, there have been many people who became famous for uploading videos on Youtube. In fact has many people who are rich because of Youtube.
Because there are many who tasted success on Youtube, there's nothing wrong we also follow. Sometimes it's true. (Hopefully)
In this post we will activate the Youtube account and upload the video. Why activate, because after creating a Gmail account basically, Youtube account is also available, just enable it. The trick is very easy, follow these steps:
Activating Youtube Account
To activate your Youtube account does not take long. If you are already logged into a Gmail account, it will be easier. But if not login, try to login first. To activate it, just go to Youtube.com and click the Sign in button in the top right corner.
If your gmail is logged in, it will be active. But if not, please login using your gmail account. And your Youtube account has also been active. If you have active, then you will be free to upload video.
One of the advantages of enabling a Youtube account is that it can access all videos, even mature ones with censored records in Indonesia.
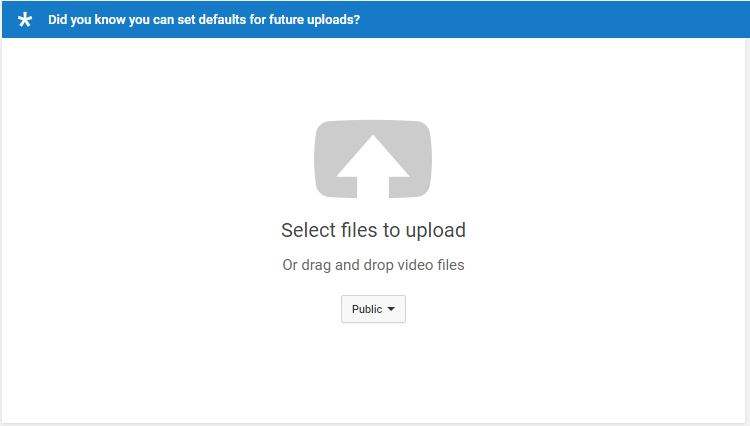
Uploading Videos on Youtube
To upload or insert a video in Youtube is also very easy way. Once you've activated your account in the top right corner of the Youtube page, there's Upload. Click the button.

You will be under on a new page to upload a video. Click the up arrow from the search for the videos you want to upload to Youtube from your computer.

After selecting the video you want to upload, while waiting for loading upload is complete (speed depends on connection) make the video title and short description in the box that has been determined. You can also choose tags, if not available please create your own. At the bottom is the display image. Usually there are three, choose one. If you have already, click Publish. Do not forget to also check social media, eg Google +.

Next will appear the result of video upload. If you click then your video can already be played on Youtube. Easy is not it!
Watch How to Upload Video to Youtube video below:
Because there are many who tasted success on Youtube, there's nothing wrong we also follow. Sometimes it's true. (Hopefully)
In this post we will activate the Youtube account and upload the video. Why activate, because after creating a Gmail account basically, Youtube account is also available, just enable it. The trick is very easy, follow these steps:
Activating Youtube Account
To activate your Youtube account does not take long. If you are already logged into a Gmail account, it will be easier. But if not login, try to login first. To activate it, just go to Youtube.com and click the Sign in button in the top right corner.
If your gmail is logged in, it will be active. But if not, please login using your gmail account. And your Youtube account has also been active. If you have active, then you will be free to upload video.
One of the advantages of enabling a Youtube account is that it can access all videos, even mature ones with censored records in Indonesia.
Uploading Videos on Youtube
To upload or insert a video in Youtube is also very easy way. Once you've activated your account in the top right corner of the Youtube page, there's Upload. Click the button.
You will be under on a new page to upload a video. Click the up arrow from the search for the videos you want to upload to Youtube from your computer.
After selecting the video you want to upload, while waiting for loading upload is complete (speed depends on connection) make the video title and short description in the box that has been determined. You can also choose tags, if not available please create your own. At the bottom is the display image. Usually there are three, choose one. If you have already, click Publish. Do not forget to also check social media, eg Google +.
Next will appear the result of video upload. If you click then your video can already be played on Youtube. Easy is not it!
Watch How to Upload Video to Youtube video below:
Well, if you already know how to upload videos on Youtube, then promote it. Can by mengsharenya in social media or by other means. The more popular your videos will be the better. Time to make interesting videos that can be seen by many people.
Happy Blogging ^_^ . .
How to Activate Youtube Account and Upload Video
The more booming video sharing on the internet, the more people are successful because of it. As handifa21.blogspot.com ~ said before, there are so many ways to make money (not necessarily rich) from the internet, one of them from Youtube.
(Read: How to Activate Youtube Account and Video Upload).
Youtube is already integrated with all Google services is also possible to connect with Google Adsense. From Adsense is the coffers of income coming through Youtube.
But before you install Google Adsense ads on Youtube, you must already be an Adsense publisher on the blog. Whether your account is Hosted or Nonhosted. If you do not have an Adsense account, then register first.
We assume you already have an Adsense account, then how to install Google Adsense ads on Youtube? Here are the steps;
- First of all activate your Google Adsense account in the same browser.
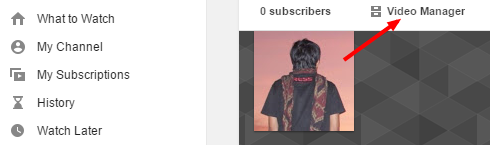
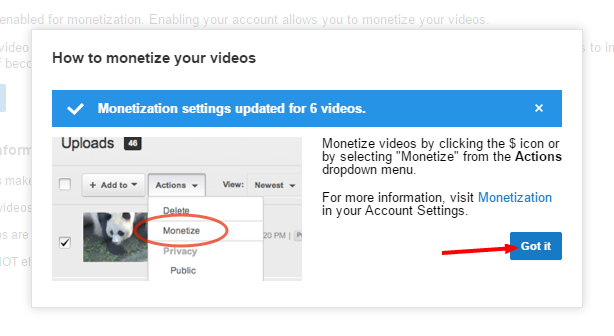
- Then visit Youtube.com, go to your channel section. At the top of your profile there is written Subscibers and Video Manager. Click Video Manager.
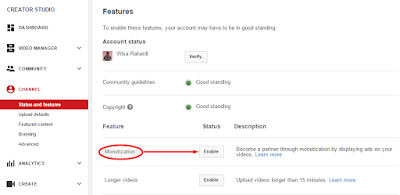
- Your Dashboard page will appear, choose the Channel menu on the left and click Enable in the Monetization section.
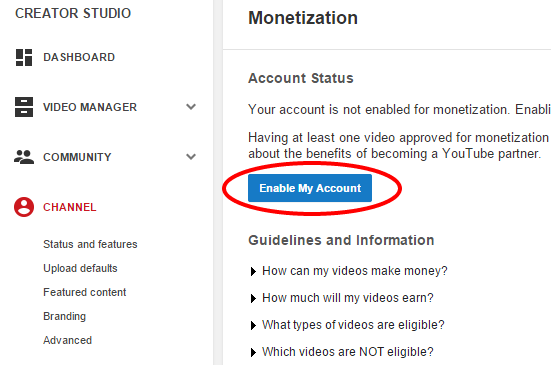
- Next will appear the confirmation section. Click Enable My Account if your account is not active.
- After clicking Enable My Account an approval sheet will appear. There are three things that must be checked in this section. Once everything is checked, click I Accept.
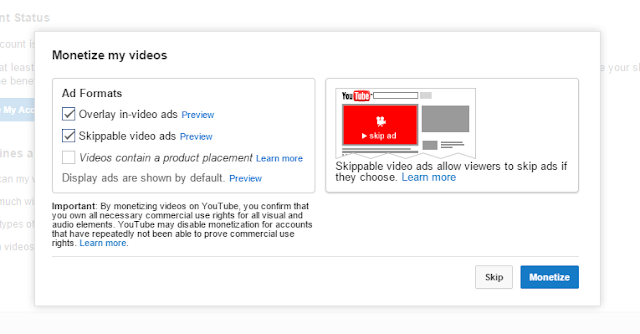
- In the next window is the preview page. Defauld, Youtube will see your Adsense Account is a Hosted account or not. If it is still a Hosted account, you can only select two types of ads, Overlay in-video ads and skippable video ads. Click preview to view. Then click Monetize
- Last click Got It.
View your videos, most likely will already show ads. How it works even with Adsense ads on blogs. Will result if anyone clicks. So in addition to promoting blogs, through videos we can make money.
The only thing you have to do is increase the number of viewers and who subscribe with your channel. If you are a reader any bloGoooblok ~ there is no harm also subscribe to the Youtube channel, because the tutorial videos will appear there.
Oh yes, before installing Adsense ads on Youtube, make sure first, the video you created does not contain pornography. Because if so, be prepared your Adsense account in banned. So be careful.
For more details, please see the video tutorial how to install Adsense ads on Youtube on video below.
How To Easily Install Google Adsense Ads on Youtube
Being a blogger, as well as a hobby can also generate financial benefits. If there is a presumption, blogging just spend money paying cafe or coffee (wifi coffee shop) can be a big mistake.
Because actually, Google has provided erning service in flatfom blogspot. Maybe you've often heard how to make money via the internet or blog. There are so many choices out there. But we will not discuss in this post.
One of the leading to make money via the internet is Google Adsense. In addition to being Google's big name as a service provider, Adsense also has appeal to many bloggers.
How not, how very easy, we are paid by Google only if there are people who click on ads that we put on the blog. Further discussion about Adsense will be discussed separately.
For this time we will discuss how to earn money from blogspot through Google Adsense service. We will register Adsense from blogspot. Follow the steps as follows:
1. Go to your blogspot Dashboard, then select the Settings tab and select the Language menu and Formatting.


Because actually, Google has provided erning service in flatfom blogspot. Maybe you've often heard how to make money via the internet or blog. There are so many choices out there. But we will not discuss in this post.
One of the leading to make money via the internet is Google Adsense. In addition to being Google's big name as a service provider, Adsense also has appeal to many bloggers.
How not, how very easy, we are paid by Google only if there are people who click on ads that we put on the blog. Further discussion about Adsense will be discussed separately.
For this time we will discuss how to earn money from blogspot through Google Adsense service. We will register Adsense from blogspot. Follow the steps as follows:
Check the availability of Adsense
If you've been blogging using the Indonesian language until the setting was in Indonesian, certainly the tab on your blogspot Dasboard is not available Income services. By that we have to activate it, its the way ;
1. Go to your blogspot Dashboard, then select the Settings tab and select the Language menu and Formatting.
- In the language selection menu, change the Indonesian format to English, either American or English United Kingdom. After that Save.
- Refresh your blogspot Dashboard, now will appear a new tab that is Income and content Adsense.
- Next look at the availability of services for your blog. If you go to the Earnings tab and at the bottom of the box look like the following, then undo your intentions first. Wait until the Sign up button Adsense is not blurred again and there is no writing beside it.
List of Adsense Through Blogspot
- If the Sign up button Adsense can already be pressed. Please register. The picture looks like this.
- There are three stages of registering Adsense through blogspot. In the first step you will be given the option of using an email account as it is being used, or using another email. Please select Yes, Use (your email).
- The second stage, just mention information about your blog. Select the language you use on your blog, then click Continue.
- The third and final stage is the application form. Fill in all options, from Country or region, Time zone and Account type (personal or business). Choose according to your choice and best suits you. While for personal information, try the contents with the information Original, Name, Address, City, Province, Postcode and Phone, then press Send My Application.
Your Adsense form has now been submitted to Google. Wait 1 time 24 hours or at most 1 week to get an answer. From bloGoooblok ~ sign up Adsense experience, after submitting the form, six hours later a letter from google arrived. The answer to whether you are accepted or not is a provider of advertising services.
It looks easy to register, and the ease is not as easy to accept by Google. By him that there are many things to watch out for if you want to use Adsense service.
Next, share your experience registering in Adsense in the comments field below. We share experiences to strengthen each other. thank you