Showing posts with label Tips & Tick. Show all posts
How to Use Psiphon on PC / Laptop (Free Internet) - OK. . . Without wasting any more time. Immediately I discussed then. Here's How to Use Psiphon on PC / Laptop (Free Internet):
1. Open Psiphon For PC that you have. If you do not have, please download the application for Psiphon For PC Here


1. Open Psiphon For PC that you have. If you do not have, please download the application for Psiphon For PC Here

2. If you want to add Proxy settings to Psiphon, how to click Settings and go to the Upstream Proxy. In the Hostname field, input the proxy that you want to use. For example, I input 128.199.150.25. In the Port column, input the appropriate proxy port. For example, I input port 80. When it is, just click Apply Changes.

3. Furthermore, if you want to choose the server you want to use. Go to the Psiphon Server Region section of the Settings menu. If I prefer to use Fastest Country. Just click Apply Changes to apply the settings.

4. Go back to the Psiphon main menu. Click Connect deh to start connecting Psiphon to the internet. Oh yes, make sure your internet is connected. If you have not connected it is the same as lying. Hehehe. . .

5. If there is a notice like the picture below, it means Psiphon you already connect

6. Congratulation your pshipon is alreay using ..
How to Use Psiphon on PC / Laptop (Free Internet)
How to Install Instagram Sidebar Widget on blog - Likes to post photos to instagram? Want to show off Instagram photos to the blog but you don't know how to do?

I'll tell you how to install the Instagram widget in your blog's sidebar. So your blog visitors can see photos from your Instagram account or your favorite photos on Instagram. The trick is not too difficult anyway, here I use the application SnapWidget is 100% FREE. Let's see more ways here ...
1. Go to SnapWidget website then click 'Get Your free Widget'.
2. Create free account

3. Complete the data form (sample image below)

4. When finished with the widget view you want, click Get Widget later there will be pop-up box appears containing HTML code widget. COPY all the code contained in the box then PASTE in the wigdet configuration, give the title title as you like, click Save


To open the widget configuration, on your blog dashboard click LAY OUT -> ADD A GADGET -> HTML / JAVASCRIPT
5. COMPLETE. Now your blog will definitely look cool !!
#(^ _ ^) HAPPY BLOGGING
Follow my instagram @reazkihandifa
How to Install Instagram Sidebar Widget on blog
How To Quickly Create Tables On Blogs - Writing activities in blogging activities never get out of the table. Table displayed to further clarify the contents of the blog post that we created. Tables usually we appear for the type of blog post that discusses the comparison of two things. In order to distinguish the core of the two comparable things readily understood by the reader then we can make the comparison in the table view.
Creating tables is easy, but to display them on blogs is quite difficult. We must understand the HTML code to assemble the table to look intact. In order to process the publication of the table on the blog runs fast, we need help of third parties to convert the tables we have created using excel into HTML format.
Example :
As for how to convert table into HTML form using Tableizer is as follows.
1. Create a table form in a table processing program such as Microsoft Excel> copy.

2. Go to the Tableizer page> paste.

3. do the font size setting, table header color, and font type> Tableize it!
4. View the conversion results preview> copy the HTML code to display the table.

5. Log in to blogger account> dashboard> create new entry> select HTML mode instead of compose.
Paste> publish.

The displayed table form can only be modified within the font size limit, font type, and header colors. We can not make further modifications as we create tables in actual table-processing programs. However, a neat and simple table view is sufficient to make the reader understand the contents of the readings displayed using the table.
Creating tables is easy, but to display them on blogs is quite difficult. We must understand the HTML code to assemble the table to look intact. In order to process the publication of the table on the blog runs fast, we need help of third parties to convert the tables we have created using excel into HTML format.
Example :
As for how to convert table into HTML form using Tableizer is as follows.
1. Create a table form in a table processing program such as Microsoft Excel> copy.

2. Go to the Tableizer page> paste.

3. do the font size setting, table header color, and font type> Tableize it!
4. View the conversion results preview> copy the HTML code to display the table.

5. Log in to blogger account> dashboard> create new entry> select HTML mode instead of compose.
Paste> publish.

Table is one important element to facilitate the reader understand the contents of article content that we make. The table will show the core of the discussion without the need for complex translation.
The displayed table form can only be modified within the font size limit, font type, and header colors. We can not make further modifications as we create tables in actual table-processing programs. However, a neat and simple table view is sufficient to make the reader understand the contents of the readings displayed using the table.
How To Quickly Create Tables On Blogs
How to Make Your Own Blog Icon Look Beautiful (Icon Favicon) - On this occasion I want to give a tutorial how to create your own blog icon with the icon to your liking. Icon blogger or there are ordinary people call it as a favicon, can you replace with icon or logo design in accordance with your wish tentunnya to look more cool blog look.
What exactly is the favicon and its position there where sh? Favicon is an icon on a web located at the top or next to the adressbar. For standard icon from blogger will look like in picture below:

Icon like this is the default code or icon that generally exist in a blog that you see if the blog has not changed its icon.
To replace your own blogger favicon icon? You need an icon, logo, or photo with a square shape that has the same width on each side and usually has a 32 × 32 size. The purpose of how to create your own blog icon is to have owned blogs look unique and different from other blogs. And of course this can be a typical blog in the eyes of visitors. Like i have this if you see the top most looks like the following:

Favicon on blog or icon for a blog should be made as good and attractive as possible although with small size, but you should be able to describe favicon or blog icon with what is in the blog. So must be related to each other.
Creating a favicon for blogs is quite easy just that you should be able to operate some editing software or to create an icon. For example by using software CorelDraw or photshop with the software you can make anything you want and the software is so easy to use let alone just to make the icon for blogger is not too difficult.
After creating the icon for the blog, now suppose you already have an icon that will be used on the blog as a favicon, please refer to the tutorial How to Make Your Own Blog Icon Look Cool (Icon Favicon) which I will discuss the following:
How To Easily Replace Icon Favicon In Blog
Here I will use one website like Genfavicon.com to create a favicon
1. Please go to the site genfavicon.com Then you will look like this:


What exactly is the favicon and its position there where sh? Favicon is an icon on a web located at the top or next to the adressbar. For standard icon from blogger will look like in picture below:

To replace your own blogger favicon icon? You need an icon, logo, or photo with a square shape that has the same width on each side and usually has a 32 × 32 size. The purpose of how to create your own blog icon is to have owned blogs look unique and different from other blogs. And of course this can be a typical blog in the eyes of visitors. Like i have this if you see the top most looks like the following:

Actually to replace this blogger favicon in blogspot already provided on Layout menu / Layout on Dasboard Blogger. By default all blogs created from blogger will have the same favicon as the blogger favicon before we replace it ourselves like the example above. For how to create your own blog icon, please refer to the following reviews.
How to Create Your Own Blog Icon
Before you decide to change blogger favicon, I suggest you better prepare the favicon first. This favicon can be built with Adobe Photoshop, Generaton icon online, or use your own photo / picture / logo. Make sure also the favicon size is a 32 × 32 square. If you want to create your own favicon you can create a favicon icon with Photoshop that can help you.
Changing the favicon on a blog should be done by every Blogger, because in checking SEO using online tools sometimes a favicon will also be assessed, if you use the default favicon of blogger then it is considered that the website or blog is not using a favicon, so it would be nice if you Replace the favicon on your blog with your own homemade favicon.
Favicon on blog or icon for a blog should be made as good and attractive as possible although with small size, but you should be able to describe favicon or blog icon with what is in the blog. So must be related to each other.
Creating a favicon for blogs is quite easy just that you should be able to operate some editing software or to create an icon. For example by using software CorelDraw or photshop with the software you can make anything you want and the software is so easy to use let alone just to make the icon for blogger is not too difficult.
After creating the icon for the blog, now suppose you already have an icon that will be used on the blog as a favicon, please refer to the tutorial How to Make Your Own Blog Icon Look Cool (Icon Favicon) which I will discuss the following:
How To Easily Replace Icon Favicon In Blog
Here I will use one website like Genfavicon.com to create a favicon
1. Please go to the site genfavicon.com Then you will look like this:

2. Enter the picture you have prepared there 2 options please select either through the url image or upload it directly (here I choose menguploadnya) and then click Upload image. Then it will look like this:

3. If you have uploaded then you can Select Size to determine the size of the image. Or also you want to cut it (crop & preview) according to the look you want. For this option please select on menu number 2 in the example picture above. If you please please select capture & preview.
4. Next after you select the capture & preview will come out your favicon view, please select Download: png. For more details note the picture below:

After you download the favicon the next step is to install on your own blog.
How to install Favicon on Blog With Easy
After the icon you have created and ready to be installed on the blog, it's time to replace the default favicon on your blog, note the following steps:
1. Login to your Blogger account. In the Blogger Dashboard please select the Layout menu (Layout), then select the favicon, note the following picture:

2. Next click EDIT and input the file you have downloaded from favicon.cc or genfavicon.com service that you have made, then save or save. Note the following picture:

3. The last stage after you finish save, then check on your blog and see the results:

Very easy is not how to create your own blog icon easily and quickly. Only based on the selection of images that match the theme of your blog and your creativity and you can make a favicon cool and interesting.
Similarly the article about "How to Create Your Own Icon Blog Cool (Icon Favicon)" which we have discussed this, hopefully this article can be useful and increase your knowledge.
Note: if this article is useful to you, PLEASE this article is shared to others AGAR other friends also get the information, and if you wish also can like the above fanspage to follow the latest update next. thanks.
How to Make Your Own Blog Icon Look Cool (Icon Favicon)

Who does not like music?
Even many things that make our visitors feel at home for long time hanging out in our blog, in addition to rich content, full of information, music also become one of the alternatives that make visitors feel at home to explore our blog. This time Admin will discuss how to install music player on blog that we have. In this case we demonstrate how to install SCM Music Player on Blog. Okay, go ahead,
1. Open Web Scm Music Player.
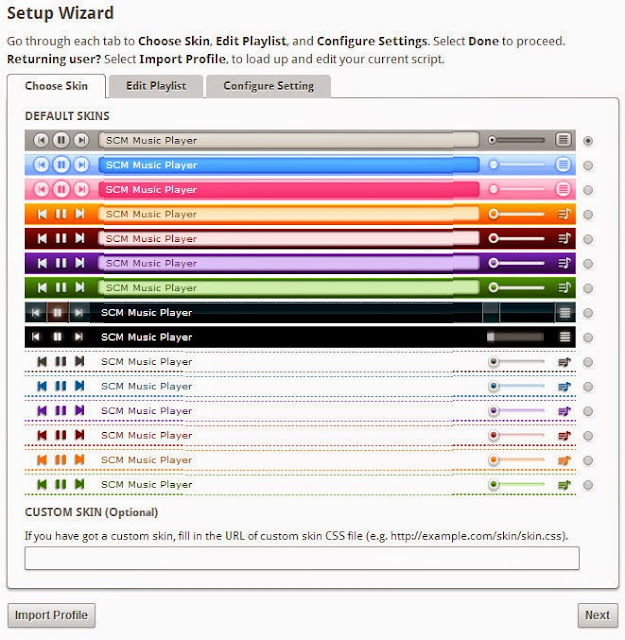
Here we choose what style to match the color of our blog or we can use the style that we make ourselves in the form of css, which of course we have uploaded on the internet, so we live pinning the url in the custom skin column. If you have selected the desired style click Next.
2. Enter the desired song
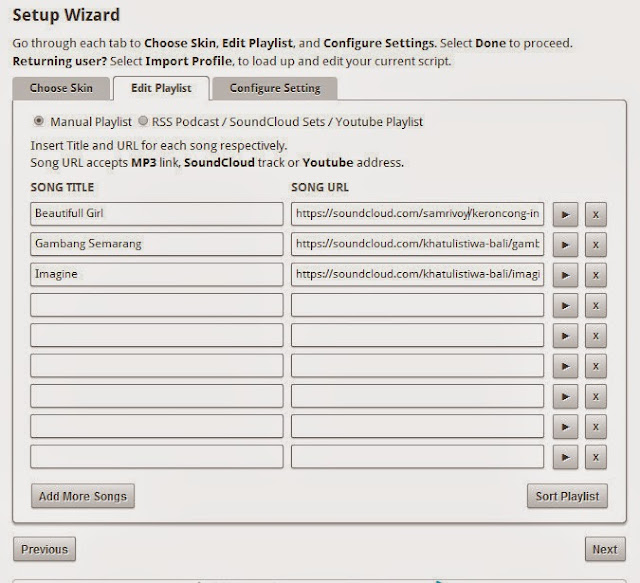
Well this part where we choose the favorite song that we will present in Blog later, in this view there are 2 columns. that is
1. Song Title
Can we fill with the title song or singer or both of them.
2. Song Url
Here we embed (paste) the url of the song we want, the URL of the song can be taken from the web eg from youtube and soundcloud. Click to tutorial how to take a song from soundcloud and youtube.
Do not forget to test the url that we enter, whether to play music or not by clicking the play sign

If it is running in accordance with the desired, do not forget to click next.
3.Setting
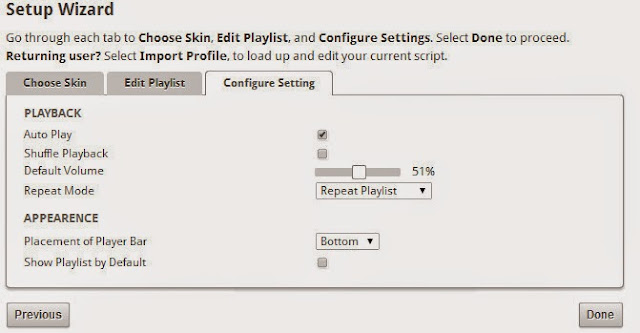
- Autoplay
For songs to automatically play when the blog is opened
- Shuffle Playback
Random song
- Default Volume
Determine how hard the volume will be played when you first load the blog.
- Repeat Mode
Contains 3 options: Repeat Playlist (Repeat song from first song if all songs have been played), play playlist once (play playlist once), repeat item (repeat one track.)
- Placement Of Playerbar
Contains 2 player placement options later on top (top) and bottom (bottom).
- how playlist by default
Functioning when checked will show the playlist list of songs since we first open the blog
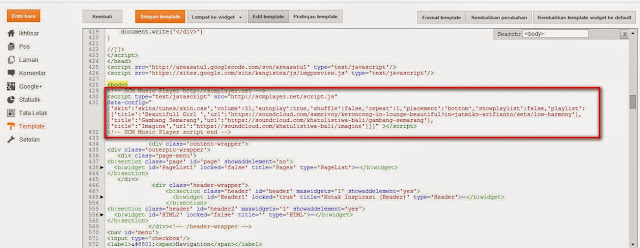
When all is considered good click done. Then we will get the html code to be placed on our blog which is exactly below <body> before the </ body> sign. Remember ... under <body>
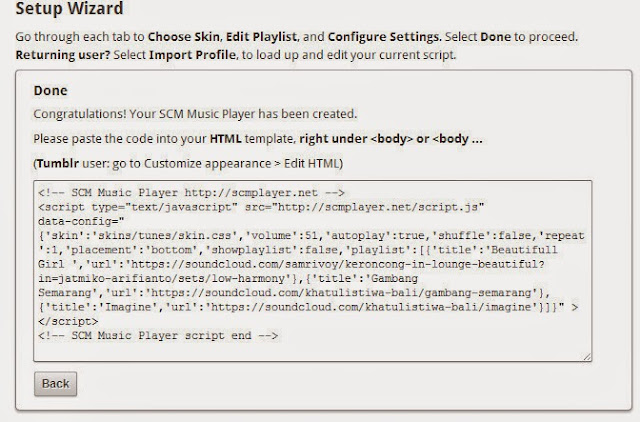
Go to blogger => Login => and go to your blog. Select template => edit html => in the box containing the html code, find the <body> tag by clicking inside the box containing the html code. Press [ctrl + F] then type <body>. After found then the next step we paste the code under <body>.
Well Now we go in The final step of testing. Open the blog and enjoy your favorite music.
How To Install Music In Blog With SCM Music Player
Changing Blog Templates is a common way bloggers do to make the site look more interesting and nice to look at. In addition to updating the view, replace the Blog template is also commonly used for the site more SEO Friendly.
Changing the template on a Blogger (blogspot) is certainly not a difficult thing, in this article Jaka explain an easy way to replace and install a new template in a Blogger and recommend the best blog templates download site site version of handifa21.blogspot.co.id .

Currently there are various Blogger templates that you can use for free. Starting from Responsive template, SEO Ready, Ads Ready, Slideshow and many more. Before you start installing a new template, you can first select the Blog template you want to use.
Blogger Template Download Sites
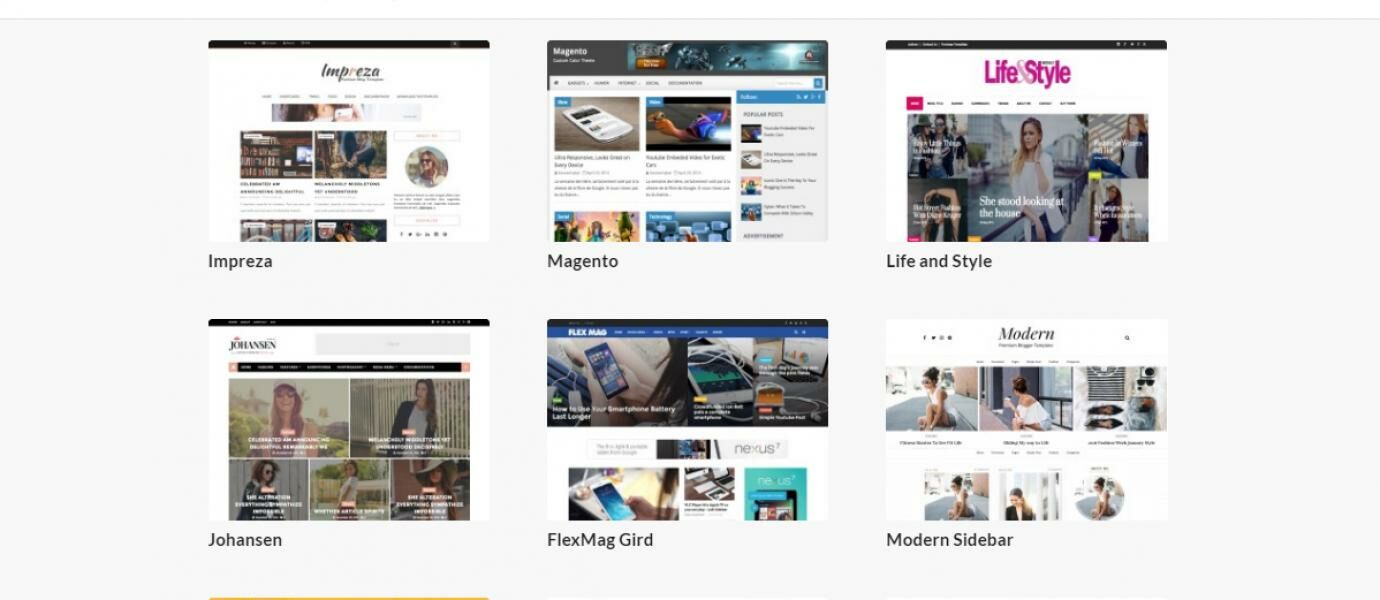
Here are some recommendations of sites where Blog template downloads you can try. If you've found a template you like, download the template and follow the steps below to install the template on Blogger.
- Gooyabi Templates
- My Blogger Themes
- Btemplates
- Templateism
- Co. Templates
- ThemeXpose
- Deluxe Templates
- Pro TemplatesLab
Please visit these sites to get the .xml template file.Oke, following its stages :
1. Here I use the template from Btemplates.com, there are various types of templates that are provided can be adjusted with this blog us. Please find the template you want. Then click the download button

2. After the template file is downloaded, extract the file by using winrar, so that the folder appears that contains template file with .xml

3. Go to the blogger dashboard, click menu template, click tblo Backup / Restore

4. Choose / search the extracted template file earlier, then click open

5. Click upload, and wait for the process for a while

6. After the template upload, then the view of your blog will soon change. Well you can see directly the look of your new blog by pressing the "see blog".

7. DONE

And now the look of your blog has been successful in the fox. So tutorial how to change blogger template. Easy enough is not it? Hopefully this simple tutorial can be useful for my readers as well
Happy blogging ^ _ ^. .
How To Easily Replace Templates (Themes) in Blogger

Here is one way to embed (embed) documents form Word, Excel, PPT and PDF on our blog or website through google docs. Google docs is a media storage of our documents that can be viewed directly online without downloading it first. For those of you who first enter the google docs, then you have to agree with the rules made by google. Here is how to embed / install google drive documents on your blog or website.
Step 1: Upload the file to google docs
1. Please login to http://docs.google.com with your gmail account.

2. Click the Open File Picker button located on the right side of your monitor screen.

3. Click the Upload button, it will display the Open a file menu view.

4. Next click "Select a file from your computer" or slide the file you want to upload to the computer screen. The file you upload can be a pdf file, word, excel, or power point.

5. Wait a while until your file uploads everything (depending on the size of the file and the speed of your connection).
6. If you have uploaded, you can edit it if you want, that is by clicking documents that have been uploaded in the My Drive menu.
7. Then to share select Share

8. Then display Sharing with others. Click the "Get shareable link"

9. Before you copy the link to share, you can change the authority of the reader, ie Anyonewith the link can edit, can comment or can view (depending on your needs)
10. Next copy the link and click Done.
11. To make it easy to open notepad or MS Word to move links:
Examples of links obtained as follows:
https://docs.google.com/document/d/1pTkGr7x3T-WYOqxDVkiqB2ynlwhR3olHHFJtxnvIQ2I/edit?usp=sharing
Step 2: Post the code google docs to blogger
1. Please login to blogger with your ID.
2. Click New Entry to create a new post.

3. Please make your post you want.
4. When you want to insert the code from google docs, there are two ways to use HTML or Compose tab.
5. Write the word "Download" on the post and block. Next click on the link menu in the menu bar.

6. Edit Link will appear. Paste the google docs code in the notepad earlier in the place you want. Click Ok.

7. Click PUBLISH Button. Next please see the results in your blog.
8. Done.
HOW TO UPLOAD FILE IN BLOG TO BE IN DOWNLOAD
How to Live Stream On Youtube? The question is very often asked when handifa21.blogspot.co.id watch a live streaming video from other youtuber in indonesia.
And this time handifa21.blogspot.co.id will try to give tutorial how to live streaming on youtube with easy and simple. In addition to tutorials you will also find a lot of information about live streaming on youtube other that hopefully can increase your knowledge about live streaming on Youtube.
Terms For Live Streaming
For live streaming, you must have a youtube account that meets the following requirements
The first requirement to be able to perform live streaming on youtube is to have a verified youtube channel. The trick is very easy, you just visit http://www.youtube.com/verify with conditions already logged into youtube and enter the phone number that can be contacted to receive sms or phone contains verification code.
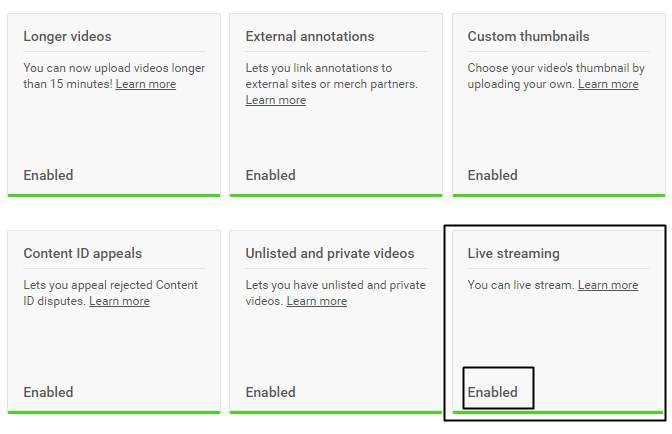
The second condition is to enable the Live streaming feature on the https://www.youtube.com/features page. And make sure you see the status of your channel Partner Verified.

And also do not forget Live Streaming feature must be in Enabled condition.
Once qualified, you can directly perform live streaming on youtube. There are two types of live streaming on Youtube ie Stream now and Events. The difference between the two is, Stream now is suitable for a very simple live event, once you start streaming live from your PC, live streaming will start immediately. This is most often used by Youtubers, like Youtuber Gaming in Indonesia which often do live Streaming on youtube.
On the Stream now page you will see 4 Settings:
And this time handifa21.blogspot.co.id will try to give tutorial how to live streaming on youtube with easy and simple. In addition to tutorials you will also find a lot of information about live streaming on youtube other that hopefully can increase your knowledge about live streaming on Youtube.
Terms For Live Streaming
For live streaming, you must have a youtube account that meets the following requirements
The first requirement to be able to perform live streaming on youtube is to have a verified youtube channel. The trick is very easy, you just visit http://www.youtube.com/verify with conditions already logged into youtube and enter the phone number that can be contacted to receive sms or phone contains verification code.
The second condition is to enable the Live streaming feature on the https://www.youtube.com/features page. And make sure you see the status of your channel Partner Verified.

Once qualified, you can directly perform live streaming on youtube. There are two types of live streaming on Youtube ie Stream now and Events. The difference between the two is, Stream now is suitable for a very simple live event, once you start streaming live from your PC, live streaming will start immediately. This is most often used by Youtubers, like Youtuber Gaming in Indonesia which often do live Streaming on youtube.
On the Stream now page you will see 4 Settings:
- Basic Info / Basic Info. Where you give the title and description Live Streaming to live streaming category.
- Stream Option / Stream Settings. Here you can choose to enable DVR or not, save live streamed video or not, choose stream optimization to add delay
- Monetization. If you want live stream videos you make money then you must activate it.
- Cards. If this is to add an interaction to your live streaming video, such as text, links, images up to the call to action button.
Whereas if you do live streaming via Events, then you can schedule when the live stream will start so that it can prepare live stream with more mature. You can try your live streaming without being noticed by the viewers and you can do more complicated settings so that live streaming can be more in line with your wishes and more optimal. You have to do the scheduling first, for example 30 minutes from now live streaming will begin.
Well in this article, handifa21.blogspot.co.id will only discuss how to live streaming on Youtube with a simple use Youtube Stream Now. For Live streaming tutorial via Events on Youtube, will we make the article as soon as possible, because it is quite complicated hehe.